Supporting multiple environments (.env)
Most companies usually go through multiple environments, such as production, staging, and development environments.
This chapter will explain how to implement a .env configuration inside your react native application to support multiple environments.
It is not recommended to commit any sensitive information in the .env file to code in case your git repo is exposed. The best practice is to put a .env.template or .env.development.template that contains dummy values, so other developers know what to configure. Then add your .env and .env.development to .gitignore.
Installing react-native-config:
yarn add react-native-config
After the installation, run the setup for iOS.
cd ios && pod install && cd ..
Setup for android:
- Add the below line of code to apply the plugin:
apply plugin: "com.android.application"

+ apply from: project(':react-native-config').projectDir.getPath() + "/dotenv.gradle"
- Create three files in root folder of the project
.env.development,.env.staging&.env.productionwhich will contain our environment variables.
// .env.development
API_URL=https://myapi.development.com

// .env.staging
API_URL=https://myapi.staging.com

// .env.production
API_URL=https://myapi.com
- Now we need to define
envConfigFilesinbuild.gradle, associating builds with env files. To achieve this, add the code below before theapply fromcall, and leave the build cases in lowercase.
+ project.ext.envConfigFiles = [
+ productiondebug: ".env.production",
+ productionrelease: ".env.production",
+ developmentrelease: ".env.development",
+ developmentdebug: ".env.development",
+ stagingrelease: ".env.staging",
+ stagingdebug: ".env.staging"
+ ]

apply from: project(':react-native-config').projectDir.getPath() + "/dotenv.gradle"
- Next, add
productFlavorsinbuild.gradle, just belowbuildTypes.
    buildTypes {
        debug {
            signingConfig signingConfigs.debug
        }
        release {
            // Caution! In production, you need to generate your own keystore file.
            // see https://reactnative.dev/docs/signed-apk-android.
            signingConfig signingConfigs.debug
            minifyEnabled enableProguardInReleaseBuilds
            proguardFiles getDefaultProguardFile("proguard-android.txt"), "proguard-rules.pro"
        }
    }

+ flavorDimensions "default"
+ productFlavors {
+ production {}
+ staging {
+ // We can have build-specific configurations here. Like using applicationIdSuffix to create different package name (ex. ".staging")
+ }
+ development {}
+ }
- Names should match based on
productFlavors, soproductiondebugwill matchdebugin this case and generate debug build of the App with configuration from.env.production.
Also add matchingFallbacks in buildTypes as shown below:
    buildTypes {
        debug {
            signingConfig signingConfigs.debug
       +     matchingFallbacks = ['debug', 'release']
        }
        release {
            // Caution! In production, you need to generate your own keystore file.
            // see https://reactnative.dev/docs/signed-apk-android.
            signingConfig signingConfigs.debug
            minifyEnabled enableProguardInReleaseBuilds
            proguardFiles getDefaultProguardFile("proguard-android.txt"), "proguard-rules.pro"
        }
    }
- Add in your
package.jsonthese scripts:
+ "android:staging": "react-native run-android --variant=stagingdebug",
+ "android:staging-release": "react-native run-android --variant=stagingrelease",
+ "android:dev": "react-native run-android --variant=developmentdebug",
+ "android:dev-release": "react-native run-android --variant=developmentrelease",
+ "android:prod": "react-native run-android --variant=productiondebug",
+ "android:prod-release": "react-native run-android --variant=productionrelease",
- Now, to have a
debugbuild withdevelopmentenvironment, run:
yarn android:dev
- Or to have a
productionbuild with release mode, run:
yarn android:prod-release
Setup iOS:
In iOS, we'll build three new schemes called
TestAppDevelopment,TestAppStaging, andTestAppProduction, each containing configuration files for the appropriate environments ofdevelopment,staging, andproduction.Open the project in Xcode by running
open ./ios/MyApp.xcworkspaceand perform the following steps to create schemes: Go to Product > Scheme > Edit Scheme in the Xcode menu.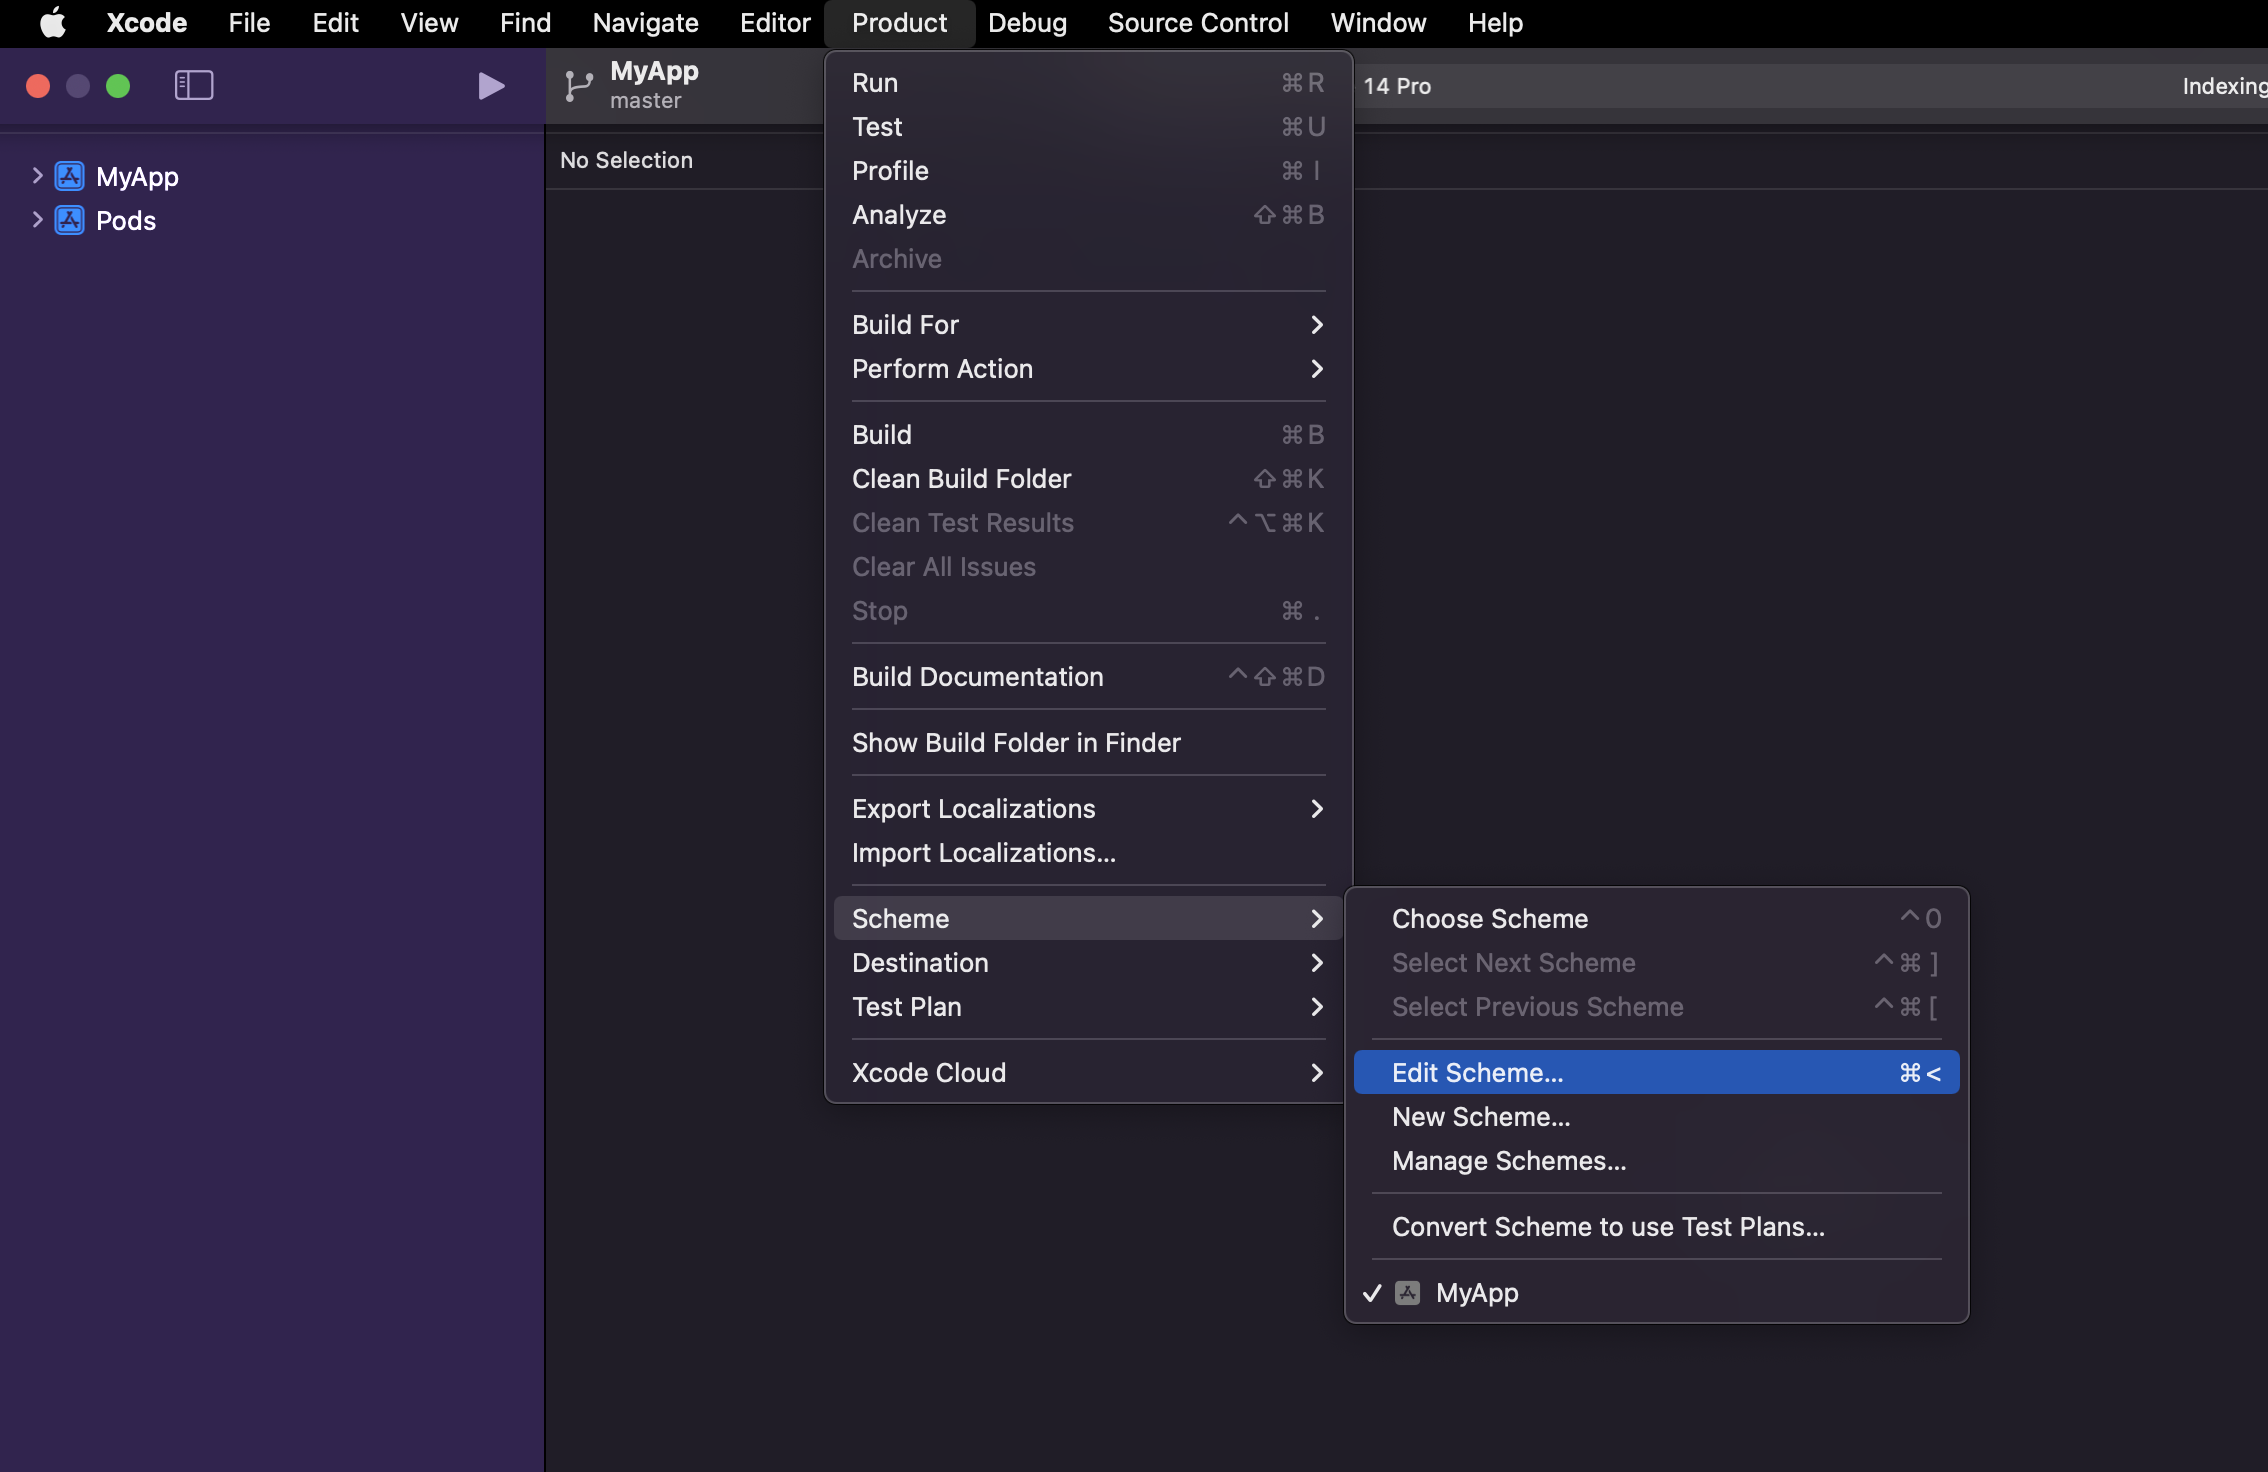
Click Duplicate Scheme on the bottom, name it
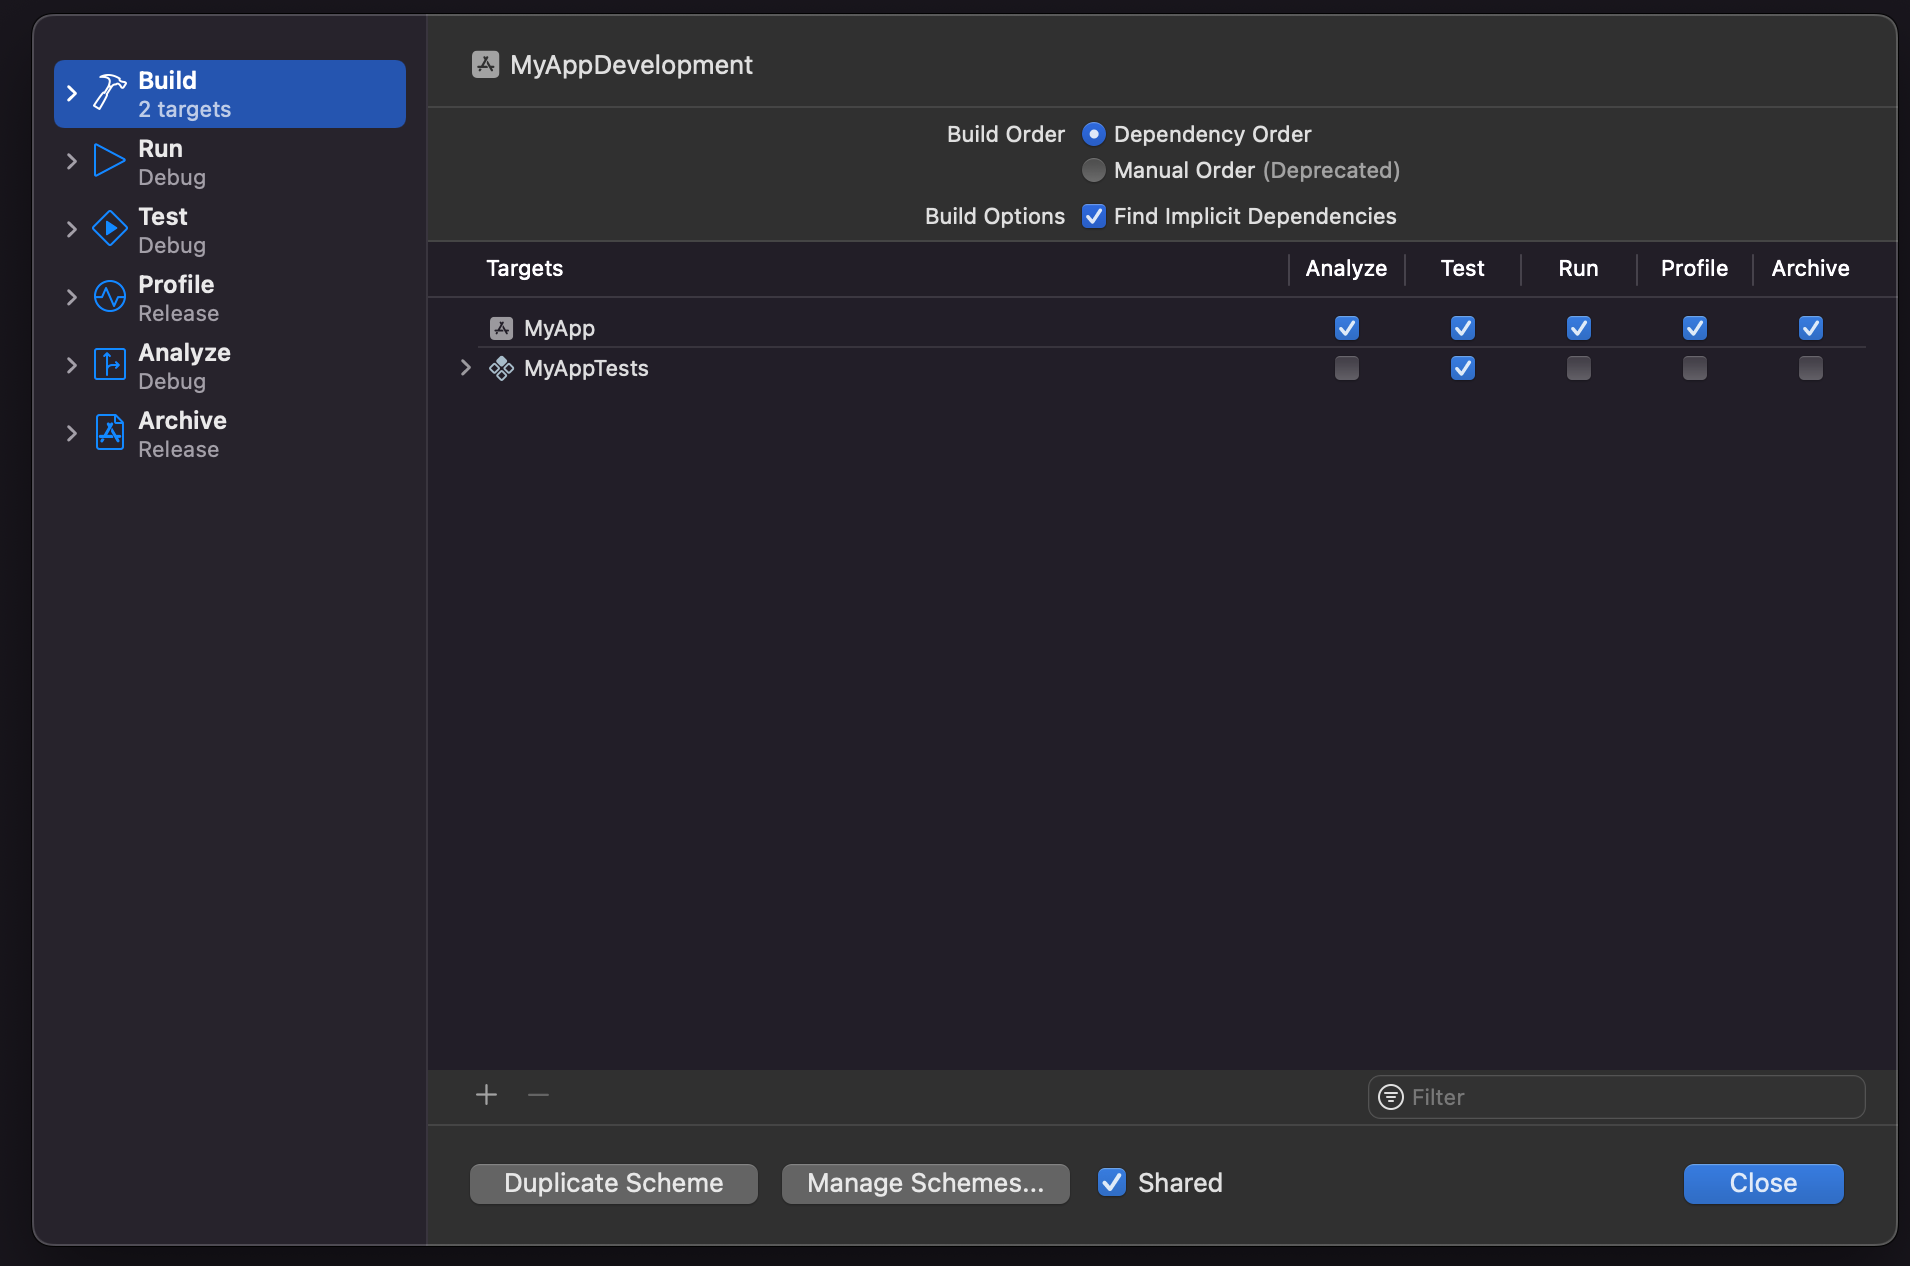
MyAppDevelopment, and check the shared checkbox. The previous actions will be repeated twice more (forMyAppStaging&MyAppProduction).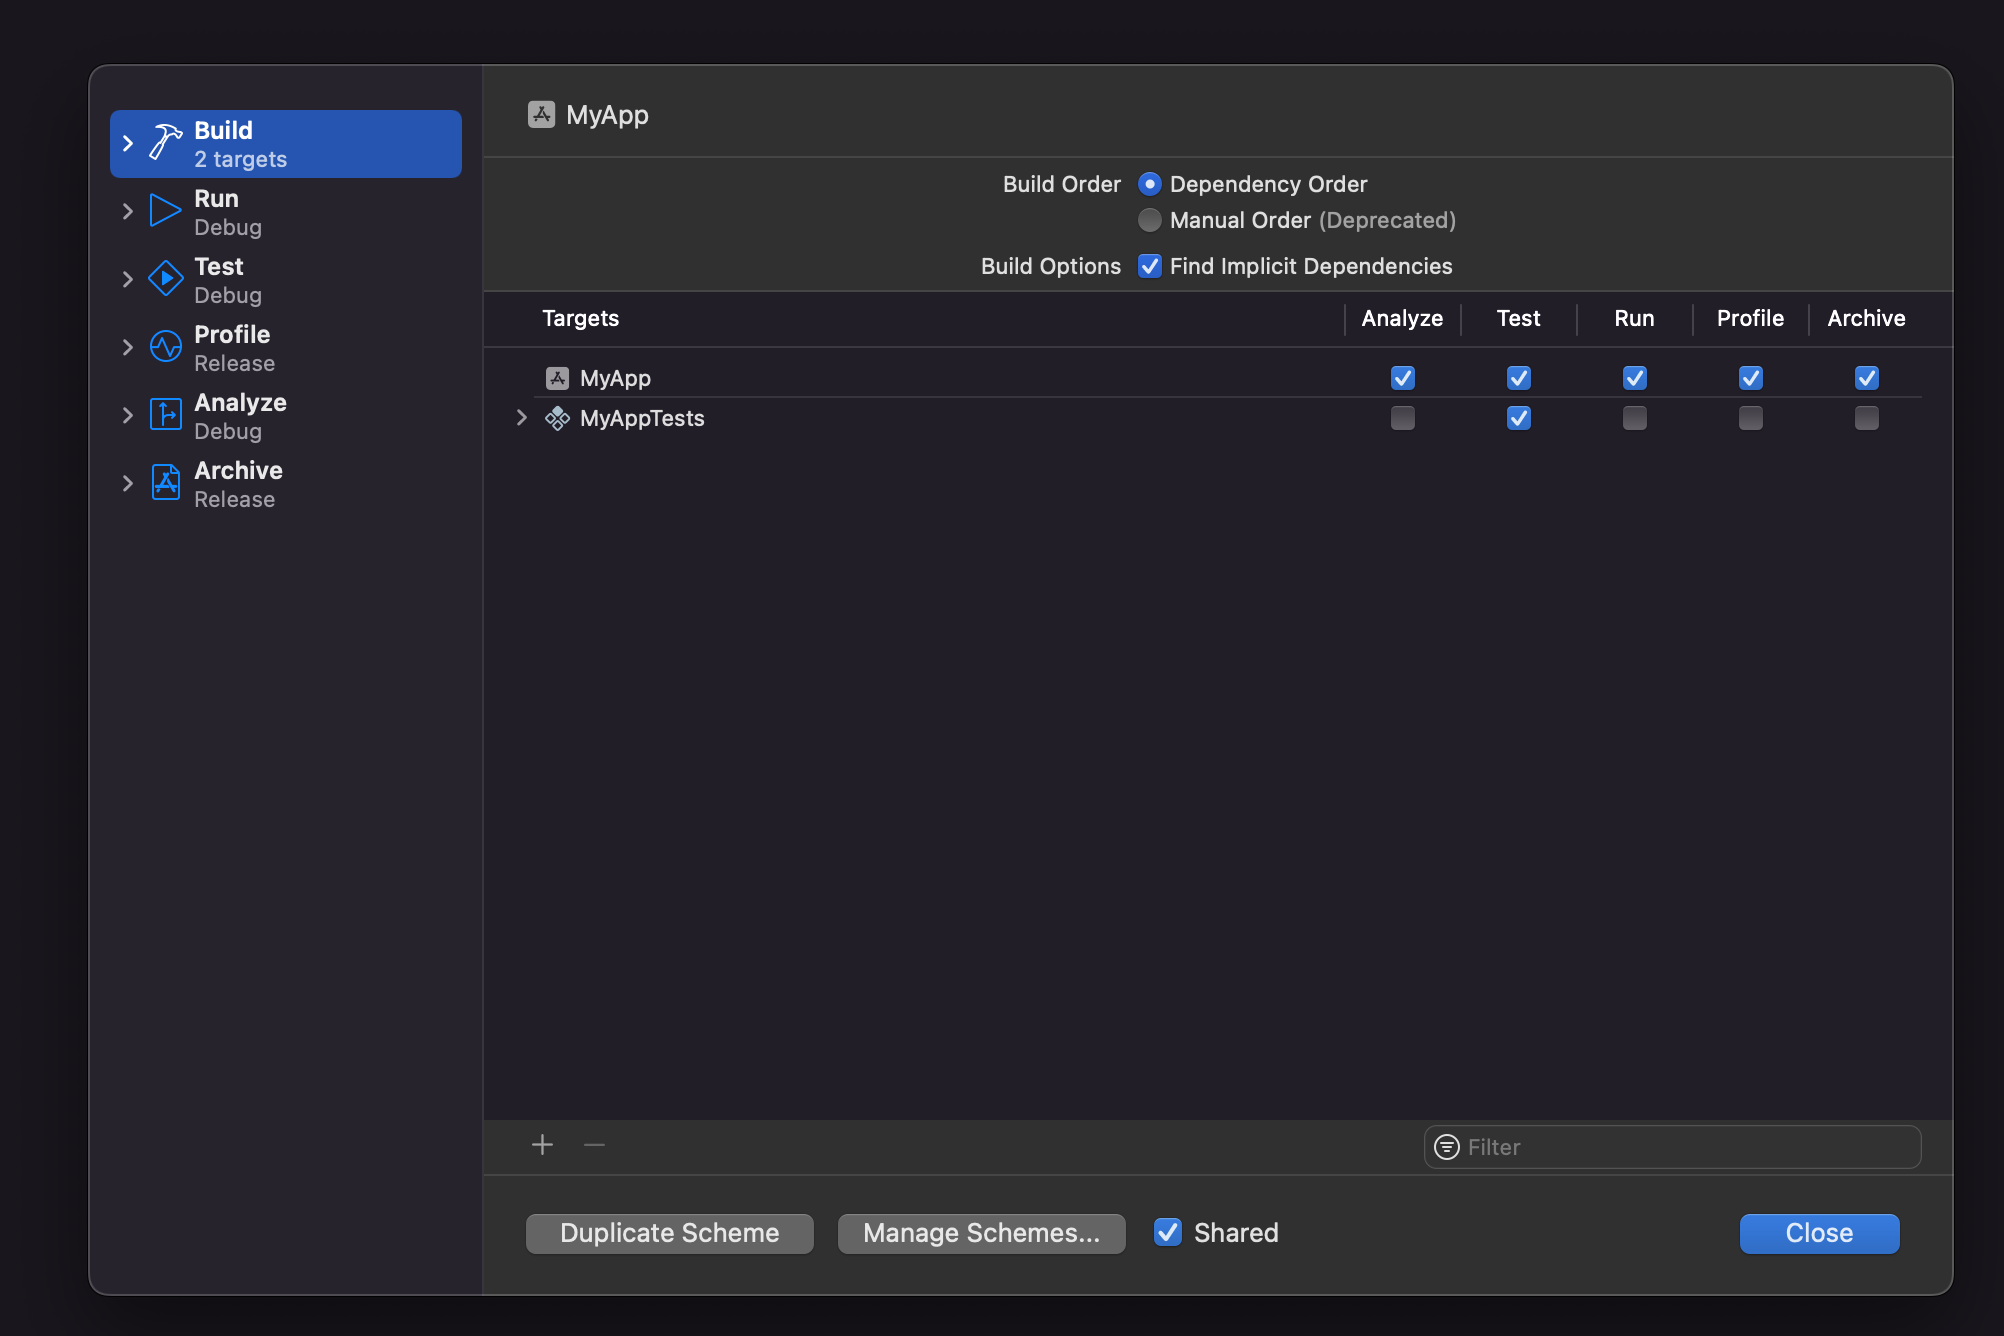
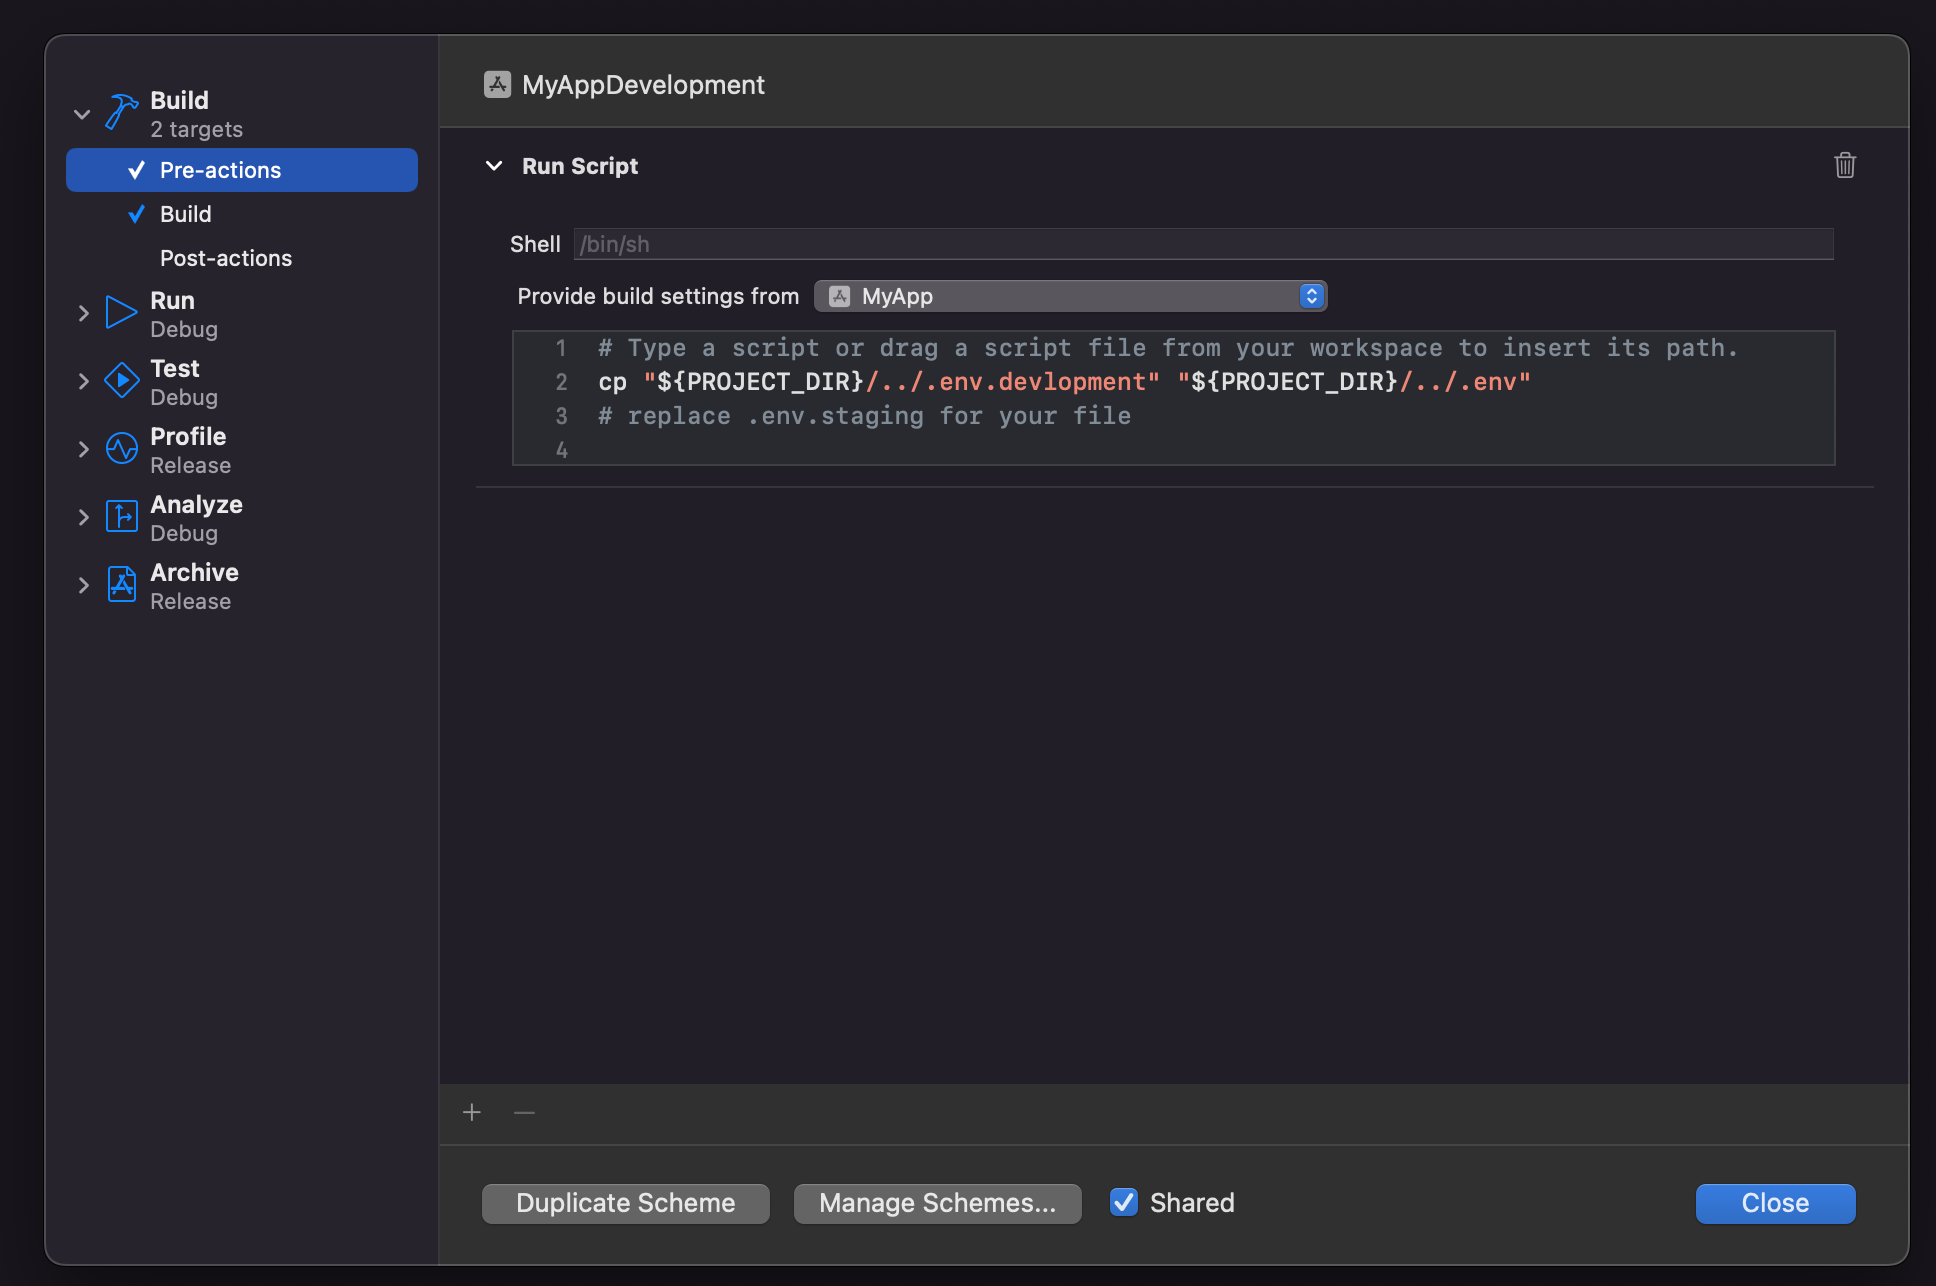
Now inside edit schemes, select the
new generated schemeand then expandBuild settings in the sidebar, selectPre actions, and under the plus sign, selectNew Run Script Action`.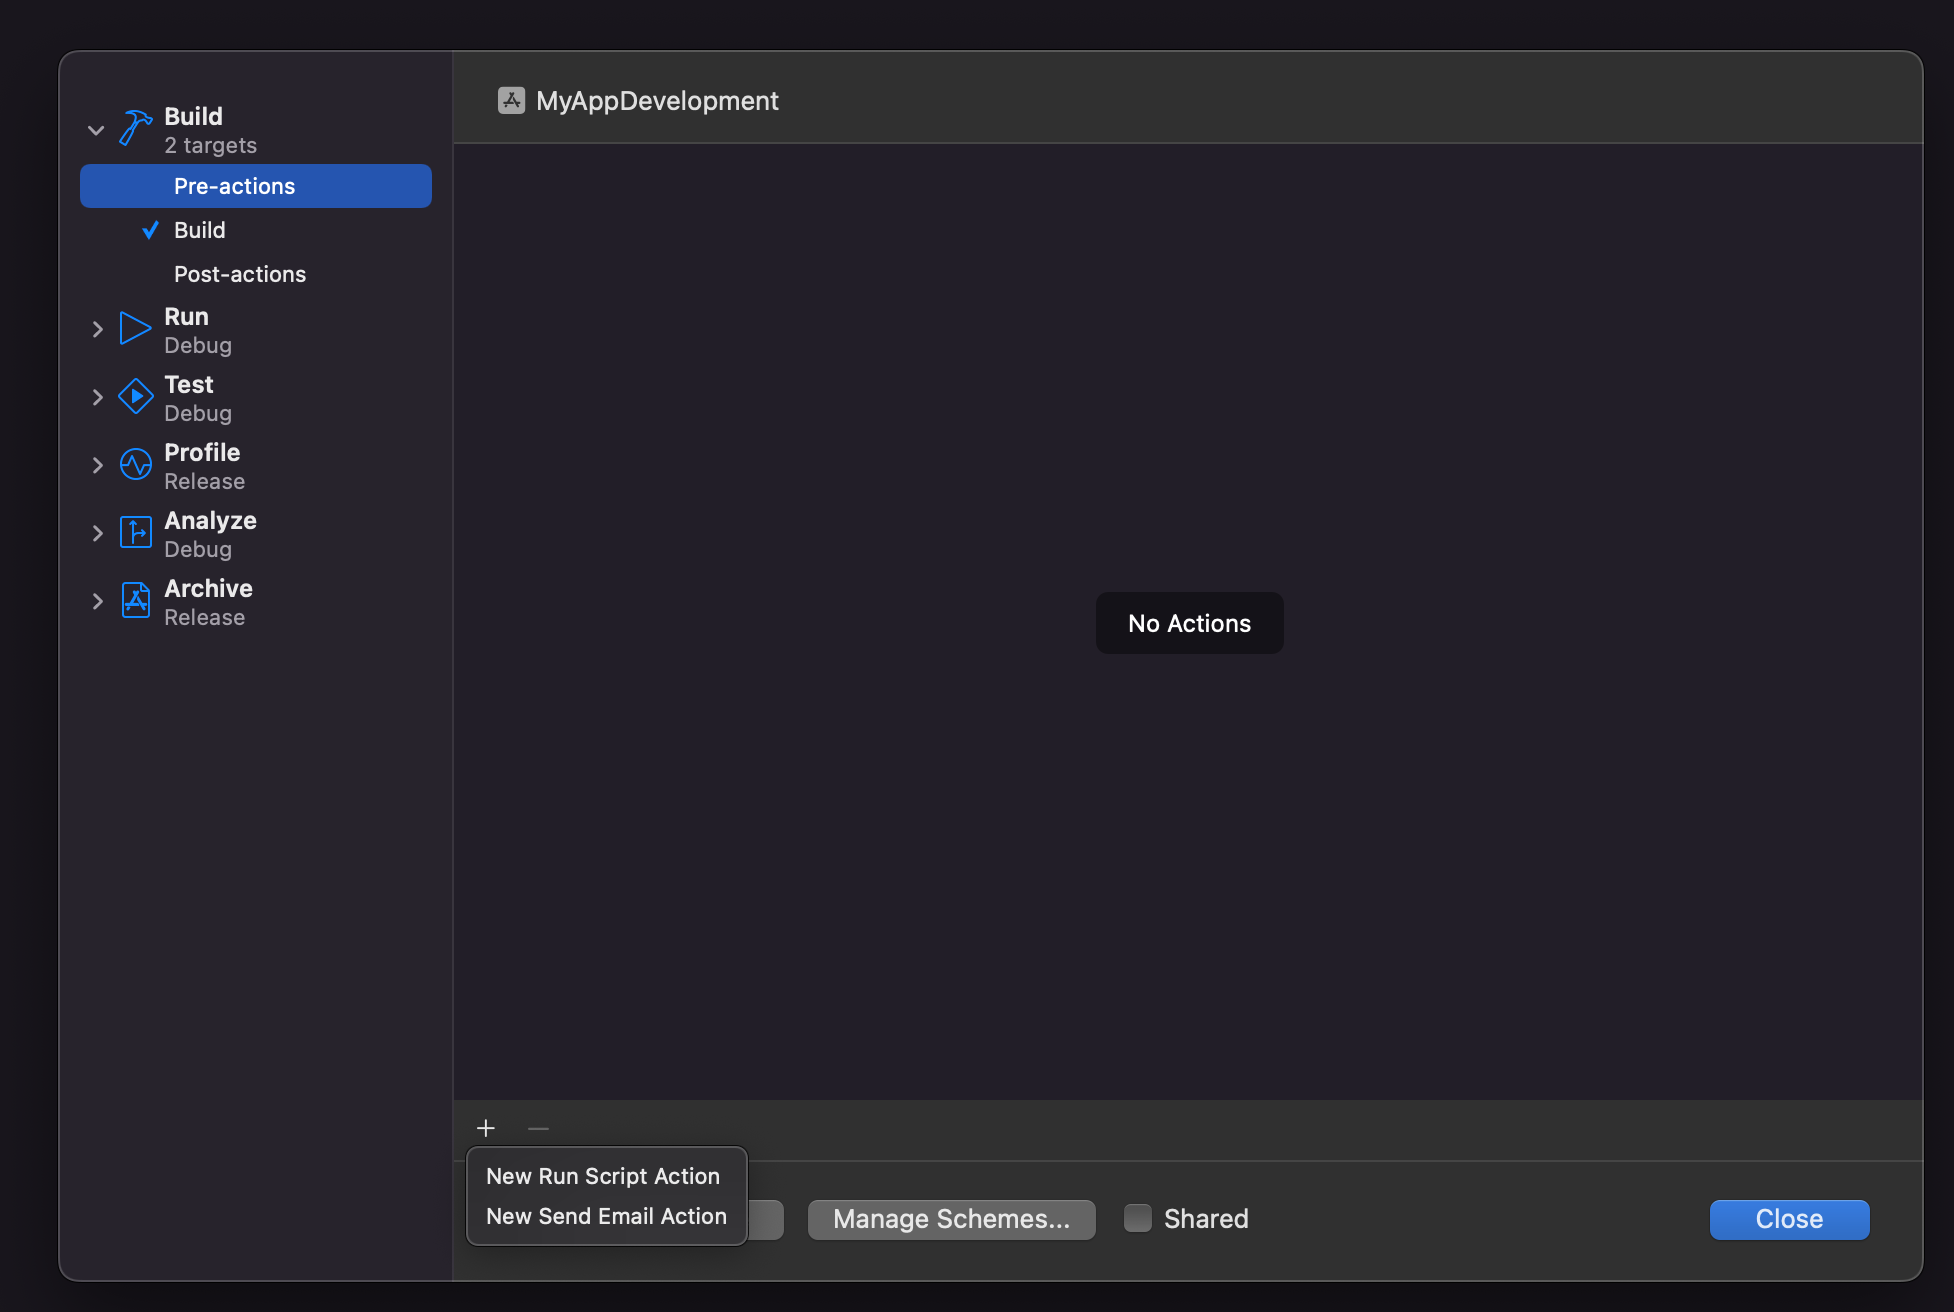
Select the project from the
Provide build settingsfrom the dropdownWhere it says
Type a script or drag a script file, type:
cp "${PROJECT_DIR}/../.env.staging" "${PROJECT_DIR}/../.env" # replace .env.staging for your file
Do the same steps as the other generated schemes.
Add the scripts to
package.json:
  "ios:dev": "react-native run-ios --scheme 'MyAppDevelopment'",
  "ios:dev-release": "react-native run-ios --configuration Release --scheme 'MyAppDevelopment'",
  "ios:prod": "react-native run-ios --scheme 'MyAppProduction'",
  "ios:prod-release": "react-native run-ios --configuration Release --scheme 'MyAppProduction'",
  "ios:staging": "react-native run-ios --scheme 'MyAppStaging'",
  "ios:staging-release": "react-native run-ios --configuration Release --scheme 'MyAppStaging'",
- Now, to have a build with the development environment, run:
yarn ios:dev
And it will run the application with development configuration.
Accessing environment variables:
- Once everything is set up, we can access the variables as follows:
import Config from "react-native-config";
Config.API_URL;
//`https://myapi.development.com`